Embarking on an E46 manual swap transforms driving dynamics‚ offering a more engaging experience. The E46 (1999-2006) is a popular platform
for this conversion‚ celebrated for its balanced handling and robust engineering. Enthusiasts frequently choose this upgrade to recapture a purist driving feel‚
especially in models originally equipped with automatic transmissions. This guide details the process‚ from initial planning to final adjustments‚
ensuring a successful and rewarding project. The E46’s popularity and readily available parts make it an ideal candidate for this modification.
Overview of the E46 Generation (1999-2006)
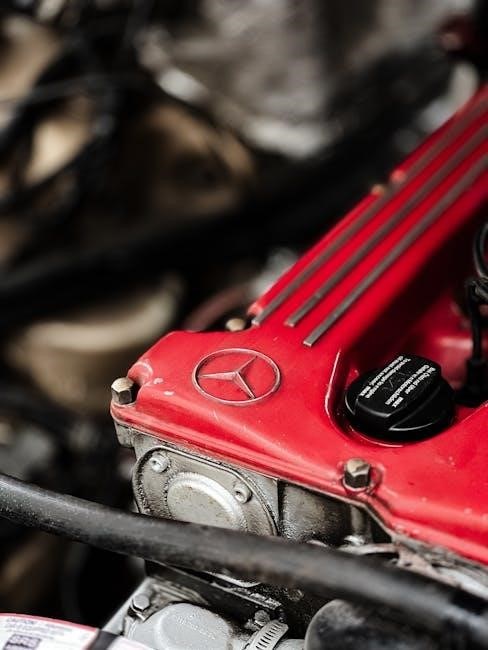
The BMW E46‚ produced from 1999 to 2006‚ represents a significant evolution in the iconic 3 Series lineage. Succeeding the E36‚ it boasted larger dimensions‚ refined styling‚ and more advanced engine technology‚ quickly earning accolades and achieving record sales – exceeding 560‚000 units globally in 2002.
Available in coupe‚ sedan‚ convertible‚ and wagon (Touring) body styles‚ the E46 offered a diverse range of engines‚ including inline-four and inline-six configurations. Models like the 325i‚ 330i‚ and the high-performance M3 catered to varied driving preferences. The E46’s chassis improvements delivered enhanced handling and ride comfort.
Its robust construction and relatively simple mechanical design have made it a favorite among enthusiasts‚ particularly for modifications like manual transmission swaps. The E46’s blend of performance‚ reliability‚ and aftermarket support continues to make it a compelling choice today.
Why Choose a Manual Swap?
Converting an E46 from automatic to manual transmission unlocks a more connected and engaging driving experience. Many enthusiasts find the direct control offered by a manual gearbox significantly enhances the car’s inherent balance and responsiveness. This swap allows for greater driver involvement‚ particularly appealing for spirited driving or track use;
Beyond the driving enjoyment‚ a manual swap can potentially improve fuel efficiency and reduce maintenance costs associated with complex automatic transmissions. It also addresses a common desire among E46 owners to personalize their vehicles and restore a more traditional BMW feel.
The E46’s robust design makes it a suitable platform for this modification‚ and the availability of donor parts simplifies the process‚ offering a rewarding project for DIY mechanics.

Planning the Swap
Successful E46 manual swaps require meticulous planning. Identifying compatible donor vehicles‚ compiling a comprehensive parts list‚ and gathering necessary tools are crucial first steps.
Identifying Compatible Donor Vehicles
Locating a suitable donor vehicle is paramount for a smooth E46 manual swap. Generally‚ E46 models with the same engine type – whether a 325i‚ 330i‚ or 325ti – are the most straightforward sources. Prioritize vehicles with the desired transmission code (typically a Getrag GS6-53BG for six-speed applications).
Crucially‚ verify the donor car’s condition; a well-maintained source minimizes potential issues. Consider factors like mileage and overall mechanical health. Vehicles from the same model year range (1999-2006) are preferable‚ simplifying component compatibility.
Pay attention to drivetrain differences; certain models may require specific driveshaft modifications. Thorough research‚ utilizing online forums and BMW parts databases‚ will ensure you secure a compatible and reliable donor vehicle for your E46 manual conversion project.
Parts List: Essential Components
A comprehensive parts list is crucial for a successful E46 manual swap. Core components include the manual transmission itself‚ a matching clutch kit (disc‚ pressure plate‚ throw-out bearing)‚ and a shift linkage assembly. The flywheel‚ specific to the manual transmission‚ is also essential.
Don’t overlook the pedal assembly – a direct swap from a manual E46 is recommended. You’ll need a clutch master cylinder and slave cylinder‚ along with the associated hydraulic lines. A revised driveshaft‚ potentially shortened or modified‚ is often required.
Finally‚ factor in smaller items like transmission mounts‚ shift bushings‚ and potentially ECU coding tools or services to remove automatic transmission settings.
Tools Required for the Conversion
A well-equipped toolkit is paramount for an E46 manual swap. Essential tools include a full socket set (metric)‚ various wrenches‚ and torque wrenches for accurate tightening. You’ll need jack stands‚ a floor jack‚ and potentially a transmission jack for safe handling of heavy components.
Specialty tools like a flywheel holding tool‚ clutch alignment tool‚ and potentially an Ecu coding cable (like INPA or NCSExpert) are highly recommended. Diagnostic tools for reading and clearing fault codes are also beneficial.
Don’t forget basic hand tools – screwdrivers‚ pliers‚ and wire cutters – alongside penetrating oil and threadlocker for disassembly and reassembly.

Disassembly & Removal
Carefully removing the automatic transmission is the first step. Disconnect the driveshaft‚ shift linkage‚ and all wiring harnesses before safely lowering the transmission.
Removing the Automatic Transmission
Begin by disconnecting the driveshaft at the rear differential flange‚ ensuring the fluid is contained to prevent spills. Support the exhaust system as it will need to be lowered to access the transmission mounting points. Next‚ detach the shift linkage and all electrical connectors attached to the transmission itself – meticulously label each connector for easier reassembly later.
Securely support the engine with an engine support bar or jack‚ as removing the transmission will leave the engine unsupported. Remove the torque converter bolts‚ then carefully separate the transmission from the engine. Lower the transmission slowly using a transmission jack‚ being mindful of any remaining connections. Thoroughly inspect the flexplate for any damage during removal. Proper support and careful disconnection are crucial for a smooth removal process.
Disconnecting Wiring Harnesses
Carefully disconnect all wiring harnesses connected to the automatic transmission‚ paying close attention to labeling each connector. This is vital for correct re-connection during the manual transmission installation. Begin with the transmission range sensor‚ the reverse light switch‚ and any associated ground straps.
The wiring for the transmission control module (TCM) will also need to be disconnected and‚ in many cases‚ removed from the vehicle entirely. Document the routing of each harness before disconnection to simplify the reinstallation process. Take photographs as a visual aid. Remember that some harnesses may share connectors with other systems‚ so proceed cautiously and refer to wiring diagrams if needed. Proper labeling prevents confusion and ensures a seamless transition.
Removing Automatic Transmission Components
After the automatic transmission is removed‚ several components must be detached. This includes the torque converter housing‚ which bolts to the engine’s flexplate. Remove the flexplate itself‚ as it’s incompatible with a manual transmission. The transmission cooler lines should be disconnected and capped‚ or removed entirely if no longer needed.
The shift linkage and selector cable‚ unique to the automatic‚ must be fully removed from the vehicle. Don’t forget the transmission mount and any associated brackets. Inspect these components for wear and consider replacing them during the swap. Thorough removal ensures a clean installation of the manual transmission and associated parts.

Installation of Manual Transmission
Carefully position the manual transmission‚ aligning the input shaft with the clutch disc. Securely mount it using the appropriate bolts‚ ensuring proper torque specifications. This step is crucial for drivetrain integrity.
Installing the Manual Transmission
The installation process demands precision and careful attention to detail. Begin by supporting the engine from above to prevent strain during transmission removal and installation. Gently raise the manual transmission into position‚ carefully aligning the input shaft with the clutch disc.
Ensure the pilot bearing is properly lubricated to facilitate smooth engagement. Secure the transmission to the engine using the correct mounting bolts‚ tightening them to the manufacturer’s specified torque. Incorrect torque can lead to premature failure or vibrations. Double-check all connections before proceeding.
Pay close attention to the transmission mounts; ensure they are in good condition and properly seated. A worn mount can introduce unwanted movement and noise. Finally‚ verify that the transmission is fully supported and stable before moving on to the next stage of the swap.
Connecting the Clutch System
Proper clutch system connection is vital for smooth operation and longevity. Install the clutch disc‚ ensuring correct orientation – typically marked “flywheel side.” Carefully align the clutch disc with the pilot bearing and pressure plate. Secure the pressure plate with the appropriate bolts‚ tightening them in a star pattern to ensure even clamping force.
Next‚ connect the clutch slave cylinder to the transmission. Bleeding the clutch line is crucial to remove air bubbles‚ ensuring proper hydraulic pressure. Use a clear hose and collect fluid during the bleeding process.
Verify the clutch fork moves freely and engages/disengages the clutch fully. A properly functioning clutch system is essential for a seamless driving experience after the manual swap.
Installing the Shift Linkage
Precise shift linkage installation guarantees accurate gear selection. Begin by mounting the shift linkage assembly to the transmission tunnel‚ ensuring proper alignment with the transmission shift rod. Connect the shift rods to the linkage‚ verifying smooth movement throughout the gear range.
Install the shift knob and boot‚ securing them firmly to the shift lever. Adjust the linkage to eliminate any binding or excessive play‚ achieving precise and confident gear changes.
Double-check all connections and fasteners‚ ensuring they are tightened to the manufacturer’s specifications. A correctly installed shift linkage is paramount for an enjoyable driving experience post-swap.

Wiring and Electronics
Adapting the E46’s wiring harness is crucial for a successful manual swap. ECU coding removes automatic transmission references‚ while addressing wiring differences ensures compatibility. Sensor integration completes the process.
ECU Coding for Manual Transmission
Successfully completing an E46 manual swap necessitates precise ECU coding. The Engine Control Unit (ECU) must be reprogrammed to recognize the manual transmission‚ eliminating any lingering automatic transmission parameters. This involves removing the automatic transmission designation (often ‘205’ in the Fahrzeugausstattung or Vehicle Configuration) from the ECU’s coding using tools like NCSExpert or INPA.
Failure to do so will result in various error codes‚ potentially impacting performance and functionality. Specifically‚ issues can arise with the transmission control system‚ leading to warning lights and driveability problems. Correct coding also ensures proper operation of related systems‚ such as the speedometer and cruise control. Accurate coding is paramount for a smooth and reliable conversion‚ avoiding frustrating post-installation issues.
Addressing Wiring Differences
The transition from automatic to manual necessitates careful attention to wiring discrepancies. Automatic transmission equipped E46s possess wiring for features absent in manual setups‚ requiring either removal or proper termination. Key areas include the transmission selector switch wiring‚ reverse light switch connections‚ and potentially‚ the automatic transmission control module wiring harness.
Specifically‚ the reverse light switch wiring needs to be adapted to function with the manual transmission’s switch. Unused wiring should be neatly tucked away and insulated to prevent shorts. Thoroughly review wiring diagrams for both automatic and manual configurations to identify and address all differences. Proper wiring ensures functionality and prevents electrical issues post-swap.
Sensor Integration and Compatibility
Successful E46 manual swaps demand careful sensor integration to maintain vehicle functionality. The manual transmission requires sensors like the speed sensor‚ crucial for accurate speedometer readings and ABS/DSC operation. Ensure compatibility between the donor transmission’s sensor and the E46’s ECU.
The clutch pedal position sensor also needs proper integration‚ informing the ECU about clutch engagement. Some models may require ECU coding to correctly interpret signals from the new sensors. Verify that all sensors are securely connected and functioning correctly post-installation. Addressing sensor compatibility prevents warning lights and ensures optimal performance of related systems.

Drivetrain Components
Adapting the drivetrain is vital for a smooth E46 manual swap. This involves evaluating the driveshaft for length compatibility and considering differential gear ratios for optimal performance.
Driveshaft Modification or Replacement
Determining driveshaft compatibility is crucial during an E46 manual swap. Automatic and manual transmission vehicles often utilize different length driveshafts‚ necessitating modification or complete replacement. Inspecting the driveshaft length after transmission installation is the first step; a mismatch can cause vibrations or damage to the transmission and differential.
Several options exist for addressing this issue. Driveshaft shortening services are readily available‚ professionally adjusting the shaft to the correct length. Alternatively‚ sourcing a driveshaft specifically designed for a manual transmission E46 is a viable solution. When selecting a replacement‚ ensure it matches your specific E46 model and differential type. Ignoring this step can lead to significant drivetrain issues and compromise the vehicle’s performance and reliability.
Differential Considerations
The differential’s role is vital when performing an E46 manual swap‚ particularly concerning the final drive ratio. While the differential itself doesn’t require direct modification during the swap‚ assessing its suitability for the new manual transmission is essential. Automatic transmissions often paired with taller final drive ratios‚ prioritizing comfort over performance.
Switching to a manual transmission allows for exploring different ratios to optimize driving experience. A shorter final drive enhances acceleration‚ ideal for track use or spirited driving‚ while a taller ratio improves fuel economy for highway cruising. Consider your intended use and driving style when evaluating the existing differential. Swapping the differential unit itself is possible‚ offering further customization options to perfectly match the manual transmission’s characteristics.
Mounting and Alignment
Precise mounting and alignment are crucial for a successful E46 manual swap. The manual transmission utilizes different mounting points compared to the automatic‚ necessitating the use of appropriate manual transmission mounts. Ensuring these mounts are correctly installed prevents vibrations and potential damage to the drivetrain;
Careful alignment of the engine and transmission is paramount. Misalignment can cause premature wear on the clutch disc‚ throw-out bearing‚ and transmission input shaft. Utilize a transmission jack for accurate positioning during installation. Double-check alignment with a straight edge after mounting. Proper alignment guarantees smooth shifting and extends the lifespan of all related components‚ contributing to a reliable and enjoyable driving experience.

Post-Installation & Troubleshooting
Following the E46 manual swap‚ thorough testing and adjustments are essential. Bleeding the clutch system is vital for proper engagement‚ while addressing any initial drive issues ensures optimal performance.
Bleeding the Clutch System
Proper clutch bleeding is paramount after an E46 manual swap‚ eliminating air bubbles that cause a spongy pedal feel or complete disengagement failure. Begin by locating the clutch slave cylinder bleed screw‚ typically on the transmission. Connect a clear hose to the bleed screw and submerge the other end in brake fluid within a container.
Using a pressure bleeder or the two-person pump-and-hold method‚ slowly pump the clutch pedal several times‚ then hold it down. Open the bleed screw briefly‚ allowing fluid and air to escape. Repeat this process until only bubble-free fluid emerges. Ensure the clutch master cylinder reservoir remains topped off throughout the bleeding process to prevent introducing more air into the system. A properly bled clutch will provide a firm‚ consistent pedal feel‚ crucial for smooth gear changes.
Testing and Initial Drive
Following installation‚ thorough testing is vital before extended driving. Begin with a static check: ensure all connections are secure‚ and fluid levels are correct. Start the engine and slowly depress the clutch pedal‚ verifying smooth engagement and disengagement. Check for any leaks around the transmission‚ clutch slave cylinder‚ and master cylinder.
Proceed with a cautious initial drive in a safe‚ open area. Pay close attention to gear engagement – it should be smooth and precise. Listen for any unusual noises from the transmission or drivetrain. Gradually increase speed‚ testing the clutch in various driving scenarios. Monitor for any signs of slippage or difficulty shifting. Address any issues immediately before further use.
Common Issues and Solutions
Despite careful installation‚ some issues may arise during an E46 manual swap. Clutch pedal feel can be inconsistent; bleeding the system thoroughly often resolves this. Difficulty shifting could indicate improper clutch adjustment or a failing slave cylinder – inspect and adjust accordingly. Unexpected noises might stem from a misaligned driveshaft or worn U-joints; verify alignment and replace components as needed.
ECU coding errors can cause warning lights or transmission malfunctions; double-check coding parameters. Sensor compatibility problems may require resistor packs or alternative sensors. If the car won’t start‚ revisit wiring connections and ECU coding. Online forums offer valuable troubleshooting advice from experienced enthusiasts.

Specific Models & Considerations
E46 manual swaps vary slightly by model. The 325i/325ci requires specific parts‚ while the 330i/330ci may need stronger clutch components. Compact (Ti) models present unique challenges due to their smaller size.
Manual Swap on the 325i/325ci
The 325i and 325ci are common E46 manual swap candidates‚ benefiting significantly from the enhanced driver engagement. Sourcing a compatible transmission from a 325i/325ci donor car simplifies the process considerably. Pay close attention to transmission codes to ensure proper fitment and functionality. Clutch compatibility is crucial; a stock 325i clutch is often sufficient for moderate power levels‚ but upgrading is recommended for increased performance.
Wiring harness integration is generally straightforward‚ but verifying all connections is vital. The ECU coding process is essential to remove automatic transmission parameters and enable manual transmission control. Driveshaft length may require modification or replacement depending on the donor vehicle’s original setup. Thoroughly inspect all mounting points and ensure proper alignment for a smooth and reliable conversion.
Manual Swap on the 330i/330ci
Performing a manual swap on the 330i/330ci requires careful consideration due to the higher power output. The stock clutch from a 325i may not withstand the increased torque‚ necessitating an upgraded clutch kit designed for the M54 engine. Sourcing a transmission from a 330i donor vehicle is ideal‚ ensuring compatibility and minimizing modifications. Pay attention to flywheel weight; a lighter flywheel can improve engine responsiveness‚ but may affect low-speed drivability.
ECU coding is paramount‚ requiring precise removal of automatic transmission settings and activation of manual transmission controls. Driveshaft modifications are often necessary to accommodate the different transmission length. Inspect the differential for wear and consider upgrading it for enhanced durability. Thorough testing after installation is crucial to verify proper operation and address any potential issues.
Compact (Ti) Model Specifics
The E46 Compact (Ti) presents unique challenges during a manual swap due to its shorter wheelbase and specific component layout. Finding a compatible donor vehicle can be more difficult‚ as the Compact’s transmission tunnel differs slightly from other E46 models. The shift linkage geometry requires precise adjustment to ensure accurate gear selection. Driveshaft compatibility is a key concern; a custom driveshaft may be necessary to achieve proper length and balance.
Pay close attention to pedal box clearance‚ as space is limited in the Compact’s interior. ECU coding must accurately reflect the manual transmission configuration‚ addressing any potential driveability issues. Thoroughly inspect the Compact’s subframe for any signs of damage or corrosion before installation.

Resources and Support
Numerous online forums and communities offer invaluable support for your E46 manual swap. Technical documentation‚ guides‚ and professional assistance are readily available to ensure success.
Online Forums and Communities
Engaging with the E46 community is crucial for a successful manual swap. Several online forums provide a wealth of knowledge‚ troubleshooting advice‚ and shared experiences.
Dedicated threads specifically address the manual transmission conversion process‚ covering everything from parts sourcing to ECU coding.
Popular platforms include the Bimmerforums and E46Fanatics‚ where experienced enthusiasts actively share their insights and offer assistance.
These communities are invaluable for diagnosing issues‚ finding compatible parts‚ and learning from others’ mistakes.
Members often post detailed build logs‚ photos‚ and videos‚ providing a visual guide to the swap process.
Don’t hesitate to ask questions – the E46 community is generally very welcoming and eager to help fellow enthusiasts achieve their goals.
Active participation can significantly streamline your project and prevent costly errors.
Technical Documentation and Guides
Comprehensive technical documentation is essential for a smooth E46 manual swap. While a complete‚ official BMW guide is rare‚ numerous resources compile the necessary information.
Detailed write-ups‚ often found on enthusiast websites and forums‚ outline each step of the process‚ from disassembly to final adjustments.
These guides frequently include wiring diagrams‚ parts lists‚ and torque specifications‚ ensuring accuracy and safety.
Bentley Publishers offers a repair manual covering the E46‚ providing valuable technical data‚ though it may not focus solely on the swap.
YouTube channels dedicated to BMW repair also feature helpful video tutorials. Supplementing these resources with the RealOEM parts catalog aids in identifying correct components.
Professional Assistance Options
For those lacking experience or time‚ professional assistance streamlines the E46 manual swap. Specialized BMW shops frequently offer the conversion as a service‚ handling all aspects from parts sourcing to installation and coding.
Expect labor costs to vary significantly based on location and shop rates‚ typically ranging from $1‚500 to $3‚000 or more. Independent mechanics with BMW expertise can also be a viable option‚ potentially offering lower rates.
When selecting a shop‚ verify their experience with E46 manual swaps and inquire about their warranty on the work performed.
Consider a pre-swap inspection to identify any potential issues that may arise during the conversion.