Little Giant Incubator Instruction Manual: A Comprehensive Guide
Welcome! This manual provides detailed guidance for various Little Giant incubator models, covering setup, operation, troubleshooting, and hatching success.
Little Giant incubators have long been a trusted name for poultry enthusiasts, hobby farmers, and educators seeking reliable and user-friendly egg hatching solutions. From simple still-air models like the 9200 to advanced digital circulated-air incubators such as the 10300 series, Little Giant offers a diverse range to suit varying needs and experience levels.
These incubators are designed to mimic the natural brooding process, providing consistent temperature and humidity crucial for successful chick development. Key features often include clear viewing windows for monitoring progress, durable construction for longevity, and straightforward controls for ease of use. Little Giant incubators accommodate various egg quantities, ranging from smaller batches with the Model 2450 to larger capacities with the 41-egg incubators.
Whether you’re a beginner or a seasoned breeder, understanding the principles of incubation and the specific features of your Little Giant model will maximize your hatching rates and ensure healthy chicks. This guide will walk you through each step, from initial setup to post-hatch care.
Understanding Different Little Giant Models
Little Giant offers a spectrum of incubators, categorized primarily by air circulation and control systems. Still-air models, like the 9200, rely on natural convection for temperature distribution, requiring careful placement and monitoring. Circulated-air incubators, such as the 10200, utilize a fan to ensure consistent temperature and humidity throughout, offering greater stability and often higher hatch rates.
Digital models – the 9300, 10300, 11300, and 12300 series – incorporate electronic temperature and humidity controls, LCD displays, and often automatic egg turning features, providing precise management and simplified operation. Capacity also varies significantly, from the compact 2450 to larger units holding 41 eggs or more.
Choosing the right model depends on your experience level, the number of eggs you intend to hatch, and your desired level of automation. Understanding these distinctions is crucial for optimal incubation success. Each model has specific instructions, detailed within this manual.
Little Giant 9200 Still Air Incubator
The Little Giant 9200 is a popular, economical still-air incubator ideal for beginners. It features a simple design with large viewing windows and a reliable heating element. Due to its still-air nature, precise placement is critical – avoid drafts and direct sunlight. Temperature regulation relies on careful adjustment of the thermostat and consistent room temperature.
Consistent monitoring with a calibrated thermometer is essential, as temperature gradients can occur within the incubator. Humidity is managed through water addition, observing the hygrometer readings. Egg turning must be done manually, typically three to five times daily, ensuring even development.
This model holds approximately 100 chicken eggs. Detailed incubation instructions are provided, emphasizing the importance of stable conditions for successful hatching. Proper ventilation is achieved through adjustable openings;
Little Giant 10200 Circulated Air Incubator
The Little Giant 10200 Circulated Air Incubator offers improved temperature consistency thanks to its built-in fan. This fan actively distributes heat, minimizing temperature gradients and simplifying incubation. It’s suitable for larger batches of eggs, holding around 100 chicken eggs, and is a step up from still-air models.
The circulated air ensures more uniform humidity levels, though monitoring remains crucial. The incubator features a digital thermometer and hydrometer for precise readings. Automatic egg turning is not included; manual turning remains necessary, but the consistent temperature reduces the criticality of precise timing.
Large viewing windows allow for easy observation without disrupting the internal environment. This model provides a more forgiving incubation experience, especially for those new to hatching.
Little Giant 9300, 10300, 11300, 12300 Digital Incubators
The Little Giant 9300, 10300, 11300, and 12300 series represent advanced incubator technology. These digital models boast enhanced performance, safety features, and precise electronic controls, rivaling more expensive units. They feature a user-friendly LCD screen for easy temperature and humidity monitoring and adjustment.
These incubators offer circulated air for consistent heat distribution, crucial for optimal hatch rates. The digital controls allow for accurate temperature settings, minimizing fluctuations. The series varies in egg capacity, accommodating different flock sizes.
Miller Manufacturing provides expert video guidance for these models, simplifying setup and operation; These incubators are designed for reliable and efficient hatching, offering a significant upgrade for serious poultry keepers.
Setting Up Your Little Giant Incubator
Proper setup is vital for success! This section details unboxing, placement, powering, and calibrating your incubator for optimal egg development and hatching rates.
Unboxing and Initial Inspection

Carefully unpack your new Little Giant incubator, ensuring all components are present. Verify you have the incubator unit itself, the power cord, any included thermometers or hygrometers, and the instruction manual. Inspect the incubator thoroughly for any shipping damage – cracks in the plastic, dents, or loose parts.
Pay close attention to the viewing windows; confirm they are intact and securely fastened. Check the heating element (if visible) for any signs of damage. If you find any damage, immediately contact the retailer or Miller Manufacturing Company for assistance. Do not attempt to operate a damaged incubator.
Familiarize yourself with the incubator’s features, like lid handles and air vents. Ensure the fan (for circulated air models) is securely mounted and spins freely. Retain the packaging materials for potential warranty claims or returns. A complete initial inspection sets the stage for successful incubation!
Placement and Environmental Considerations
Select a stable, level surface for your Little Giant incubator, away from direct sunlight, drafts, and high-traffic areas. Consistent temperature is crucial; avoid placing the incubator near exterior walls or doors. Ideal ambient temperatures range between 65°F and 85°F (18°C ‒ 29°C) for optimal performance.
Ensure adequate ventilation around the incubator, but prevent direct airflow onto the unit. Avoid damp or humid locations, as excessive moisture can disrupt humidity control. Keep the incubator away from heat sources like radiators or stoves.
Consider the space needed for access during candling and egg turning. A quiet location minimizes stress for developing chicks. Remember, a stable environment significantly increases hatch rates. Protect the incubator from pets and young children. Proper placement is key to a successful hatch!
Powering the Incubator
Before connecting your Little Giant incubator, verify that your power outlet matches the unit’s voltage requirements – typically standard 110-120V AC. Use a grounded outlet to prevent electrical hazards. Avoid using extension cords if possible; if necessary, ensure it’s a heavy-duty cord rated for the incubator’s wattage.
Plug the incubator securely into the outlet. Digital models will immediately display temperature and humidity readings. For still-air models, allow several hours for the temperature to stabilize. Monitor the temperature closely during the initial setup phase.
Never operate the incubator with a damaged power cord. If the cord is damaged, discontinue use and contact Miller Manufacturing for a replacement. Consistent power is vital for maintaining stable incubation conditions. A power outage can be detrimental; consider a backup power source if outages are frequent.
Calibrating the Thermometer and Hygrometer
Accurate temperature and humidity readings are crucial for successful hatching. While Little Giant incubators come with pre-calibrated instruments, verifying their accuracy is recommended, especially with digital models featuring LCD screens. Use a calibrated external thermometer and hygrometer for comparison.
To calibrate, compare the incubator’s readings with the external instruments. If discrepancies exist, adjust the incubator’s controls (if adjustable) to match the external readings. Some digital models allow direct calibration through the settings menu. For still-air models, minor adjustments to ventilation may help fine-tune temperature.
Regularly check calibration throughout the incubation period. Fluctuations can occur. Maintaining precise control ensures optimal embryo development. Document any adjustments made for future reference. Consistent monitoring and calibration are key to maximizing hatch rates.
Incubation Process: A Step-by-Step Guide
This section details egg selection, preparation, candling, temperature & humidity control, and turning procedures – essential steps for successful hatching with your Little Giant.
Egg Selection and Preparation
Successful hatching begins with careful egg selection. Choose clean, uncracked eggs from healthy flocks. Inspect for any abnormalities – excessively large or small eggs, or those with unusual shapes – and discard them. Freshly laid eggs generally exhibit higher hatch rates, so use eggs within seven days of collection if possible.
Before placing eggs in the incubator, proper preparation is crucial. Avoid washing eggs, as this removes the protective bloom. If cleaning is absolutely necessary due to excessive dirt, gently wipe with a slightly dampened cloth. Store eggs pointed-end down for optimal embryonic development.
Allow eggs to warm to room temperature gradually before incubation, especially if they’ve been refrigerated. A sudden temperature change can harm the developing embryo. Proper handling and preparation significantly increase your chances of a successful hatch with your Little Giant incubator.
Candling Eggs
Candling is a vital process for monitoring embryonic development and identifying infertile eggs. Begin candling around day 7-10 of incubation, using a bright, focused light source – a candling lamp is ideal, but a strong LED flashlight can also work. Darken the room for better visibility.
Hold the egg against the light, observing for visible veins radiating from a dark spot (the developing embryo). Fertile eggs will show a network of blood vessels. Infertile eggs will appear clear or show a uniform, translucent appearance. Remove infertile eggs promptly to prevent contamination.
Continue candling periodically throughout incubation to monitor development. By day 18-21, a fully developed embryo will obscure most of the air cell. Avoid prolonged candling, as it can cool the egg. Careful candling helps ensure a healthy hatch with your Little Giant incubator.
Temperature Control
Maintaining a consistent and accurate temperature is paramount for successful hatching with your Little Giant incubator. For most poultry species, a temperature of 99.5°F (37.5°C) is optimal. Regularly monitor the incubator’s thermometer, and calibrate if necessary, ensuring accuracy. Fluctuations should be minimal – avoid exceeding ±1°F.
Still air incubators require careful placement away from drafts and direct sunlight, as temperature distribution can be uneven. Circulated air models offer more consistent temperatures due to the fan. Digital models provide precise temperature control and often feature alarms for deviations.
Avoid frequent opening of the incubator, as this causes temperature drops. Observe the incubator for at least 24 hours to establish a stable temperature before adding eggs. Consistent temperature management is key to healthy embryo development.
Humidity Control
Proper humidity levels are crucial alongside temperature for successful hatching in your Little Giant incubator. Generally, maintain humidity between 50-65% during incubation, increasing to 65-75% during lockdown (the last three days before hatching). Use a hygrometer to monitor humidity accurately and calibrate it regularly.
Adjust humidity by adding or removing water from the incubator’s water channels. The amount of water needed will vary depending on the incubator model and ambient humidity. Larger viewing windows can also impact humidity levels.
Insufficient humidity can cause eggs to lose excessive moisture, leading to stuck chicks. Conversely, excessive humidity can hinder proper air sac development. Observe the water loss from the eggs; a diminishing water spot indicates sufficient humidity.
Egg Turning Procedures
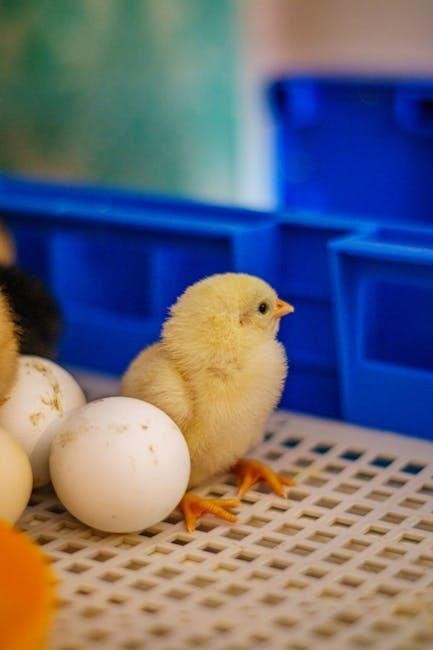
Consistent egg turning is vital for preventing the yolk from sticking to the shell membrane during incubation, ensuring proper embryo development. For still-air incubators like the Little Giant 9200, manual turning is required at least three to five times daily. Mark each egg with an ‘X’ on one side and an ‘O’ on the opposite side to track turning.
Circulated-air models, such as the 10200, often feature automatic egg turners. Ensure the turner is functioning correctly and that eggs are positioned properly within the tray. Even with automatic turners, periodically check for any eggs that aren’t being turned.
Stop turning eggs three days before the expected hatch date (lockdown). This allows the chicks to orient themselves for pipping and hatching. Avoid handling eggs during lockdown to minimize disturbance.

Advanced Features and Troubleshooting
Explore digital controls, air circulation systems, and solutions for common issues. This section details LCD screen usage and maintenance for optimal Little Giant performance.

Using the LCD Screen (Digital Models)
The LCD screen on your Little Giant digital incubator provides crucial real-time information and control. Familiarize yourself with its functions for precise incubation management. The screen prominently displays current temperature and humidity levels, allowing for quick assessment of the incubator’s environment. Use the control buttons to adjust these settings, ensuring they align with the specific requirements of the eggs you are incubating.
Digital models often feature set point adjustments, enabling you to define your desired temperature and humidity. The screen will also indicate when the heating or cooling system is actively working to maintain these levels. Many models include egg count reminders and turning timers, simplifying the incubation process. Pay attention to any alarm indicators, which signal deviations from the set parameters, requiring immediate attention. Regularly checking the LCD screen ensures optimal conditions for successful hatching, maximizing your chick yield and minimizing potential issues.
Understanding Air Circulation (Circulated Air Models)
Little Giant circulated air incubators utilize a fan to distribute heat evenly throughout the egg chamber, creating a more consistent temperature profile compared to still-air models. This consistent temperature is vital for uniform embryo development and higher hatch rates. The fan ensures that air reaches all eggs, eliminating cold spots and minimizing temperature gradients.
Proper air circulation also aids in humidity distribution, preventing localized areas of excessive or insufficient moisture. Regularly check the fan’s operation to confirm it’s functioning correctly; a malfunctioning fan can severely compromise incubation results. Ensure the ventilation openings are not obstructed, allowing for adequate airflow. Circulated air models generally offer greater capacity and are more forgiving of ambient temperature fluctuations, making them ideal for larger-scale hatching or environments with variable conditions. Consistent monitoring and maintenance of the fan are key to maximizing the benefits of this system.
Troubleshooting Common Issues
Temperature Fluctuations: Verify the thermometer’s calibration and ensure proper incubator placement away from drafts. Check the heating element for functionality. Humidity Problems: Adjust water tray levels; ensure proper ventilation. Low humidity can cause membranes to stick, while high humidity hinders air exchange.
Poor Hatch Rates: Confirm egg quality, proper turning, and consistent temperature/humidity. Fan Malfunction (Circulated Air Models): Replace the fan if it’s not operating. Digital Display Errors: Reset the incubator or consult the manufacturer. Eggs Not Turning: Inspect the turning mechanism for obstructions. Regularly clean the incubator to prevent bacterial growth. If issues persist, consult the manufacturer’s website or contact customer support for assistance. Accurate record-keeping of temperature and humidity levels aids in diagnosing problems.
Cleaning and Maintenance
Regular cleaning is crucial for maintaining a hygienic incubation environment and preventing bacterial or fungal growth. After each hatch, thoroughly disinfect the incubator with a poultry-safe disinfectant. Remove all remaining eggshells and debris. Wipe down all interior surfaces, including the water trays and turning mechanisms.
Avoid abrasive cleaners that could damage the plastic components. Ensure the incubator is completely dry before reassembling. Periodically inspect the fan (in circulated air models) for dust accumulation and clean as needed. Check the thermometer and hygrometer for accuracy and replace batteries if necessary. Proper maintenance extends the incubator’s lifespan and ensures optimal performance. Store the incubator in a clean, dry place when not in use. A well-maintained incubator contributes significantly to successful hatching rates.

Specific Model Instructions
This section details unique instructions for Little Giant incubators, including Model 2450 and the 41-egg incubator, ensuring optimal performance for each unit.
Little Giant Model 2450 Instructions
The Little Giant Model 2450 is a popular still-air incubator, ideal for beginners and smaller-scale hatching projects. Before initial use, thoroughly inspect the unit for any damage. Proper placement is crucial; choose a location with stable temperature, away from direct sunlight and drafts. Ensure adequate ventilation around the incubator.
To begin, fill the water reservoirs to achieve the desired humidity level, typically around 50-65% for chicken eggs. Monitor humidity closely using a reliable hygrometer. Temperature regulation relies on careful adjustment of the thermostat; aim for 99.5°F (37.5°C). Consistent temperature is vital for successful development.
Eggs should be turned at least three times daily, ideally at even intervals, to prevent adhesion and ensure proper embryo development. The Model 2450 lacks automatic turning, requiring manual intervention. Candling eggs around day 7-10 allows you to assess fertility and identify any developing issues. Remember to maintain cleanliness throughout the incubation period.
Little Giant 41 Egg Incubator Instructions
The Little Giant 41 Egg Incubator, a circulated air model, offers enhanced temperature consistency due to its built-in fan. This model features a digital thermometer and hydrometer for precise monitoring, alongside two large viewing windows. Begin by ensuring proper ventilation and a stable room temperature. The fan ensures even heat distribution throughout the incubator.
Set the desired temperature to 99.5°F (37.5°C) and humidity levels based on the species you are hatching – typically 50-65% for chickens. Regularly check and adjust as needed. The digital display provides accurate readings, simplifying the process. Automatic egg turning is not included; manual turning three to five times daily is essential.
Candling around day 7-10 helps identify fertile eggs and monitor development; Maintain cleanliness by regularly wiping down surfaces. The circulated air system promotes uniform heating, increasing hatch rates. This incubator is designed for ease of use and reliable performance.

Hatching and Beyond
Lockdown begins three days before the expected hatch date; cease turning eggs and increase humidity. Patience is key as chicks emerge – avoid assisting unless absolutely necessary!
Lockdown Procedures
Initiating lockdown is a critical phase, typically commencing three days prior to the anticipated hatch date. This period signals a shift in incubator management, demanding meticulous attention to detail. The primary action during lockdown is to completely stop egg turning. Allowing the chicks to settle naturally against the shell is vital for proper positioning and successful hatching.
Simultaneously, increase humidity levels significantly. This prevents the membrane from drying out and allows the chicks to hatch cleanly. Refer to your specific model’s instructions for precise humidity recommendations, but generally, a substantial increase is required. Avoid opening the incubator unnecessarily during lockdown, as fluctuations in temperature and humidity can jeopardize hatching rates.
Resist the urge to assist chicks during hatching. While it’s tempting to help, premature intervention can cause harm. Allow the chicks to pip and zip independently. Observe closely, but only intervene if a chick appears truly stuck and unable to progress after a prolonged period. Proper lockdown ensures a higher hatch rate and healthier chicks.
Hatching Day
Hatching day is the culmination of your incubation efforts! Expect the first chicks to pip (break through the shell) around day 21 for chicken eggs, though timing varies by species. Resist the strong urge to help chicks emerge; allowing them to hatch independently is crucial for their development and strengthens their immune systems.
Maintain stable conditions – temperature and humidity should remain consistent with lockdown settings. Observe the incubator frequently, but minimize openings to avoid disrupting the process. As chicks hatch, they’ll appear wet and exhausted. Leave them undisturbed within the incubator to dry and fluff up, gaining strength.
Once most chicks have hatched (typically within 24-48 hours), and are fully dry, you can carefully remove them to a prepared brooder. Leaving a few late hatchers can be beneficial, allowing them to catch up. Enjoy the reward of your patience and careful management!
Post-Hatch Care
Post-hatch care is vital for ensuring healthy chick development. Transfer newly hatched chicks to a pre-warmed brooder, maintaining a temperature of 90-95°F (32-35°C) initially, decreasing by 5°F each week. Provide a chick starter feed and fresh, clean water readily available in shallow containers to prevent drowning.
Observe chicks closely for signs of illness, such as lethargy, ruffled feathers, or digestive issues. Ensure the brooder is clean and dry, replacing bedding regularly to prevent ammonia buildup. Proper ventilation is crucial, avoiding drafts while maintaining adequate airflow.
Supplement with vitamins and electrolytes as needed, especially during the first few days. Monitor their eating and drinking habits, and adjust the brooder environment accordingly. Consistent care during this stage sets the foundation for strong, thriving poultry.
Frequently Asked Questions
Q: Why isn’t my incubator maintaining temperature? A: Ensure proper placement away from drafts and direct sunlight. Calibrate the thermometer and check the heating element.
Q: What humidity level is best? A: Generally, 50-55% for the first 18 days, increasing to 65-75% during lockdown. Adjust water tray size accordingly.
Q: My eggs aren’t turning automatically. What should I do? A: Verify the turner motor is functioning and the egg trays are properly installed. Manual turning is necessary if the automatic turner fails.
Q: Can I use any type of water in the incubator? A: Use distilled or filtered water to prevent mineral buildup.
Q: Where can I find replacement parts? A: Contact Miller Manufacturing Company or authorized dealers for parts.